Remove rows that exist in another table in Power Query – How to use an Anti-Join (Not-In-Join) for data cleansing in Power BI
This post is also available in:
![]() German
German
When you’re preparing your data in Power Query, you might come to the point where you have to exclude rows in one table, that exist in another table. An example would be if in the sales table you want to exclude rows from business customers or rows from any kind of “black list”. In SQL this is called an anti-join.
How you can use an anti-join in Power Query, I will explain in this article.
What is a Anti-Join or a Not-In-Join?
An anti-join, also known as a not-in-join, is a way to filter out rows in one table that match a specific condition in another table. It’s like taking the opposite of a regular join, where you combine matching rows from two tables.
With an anti-join, you exclude rows from one table that have a matching value in another table, based on a specified column. This can be useful for data cleansing tasks, such as removing duplicates or filtering out unwanted data.
Scenario for our example
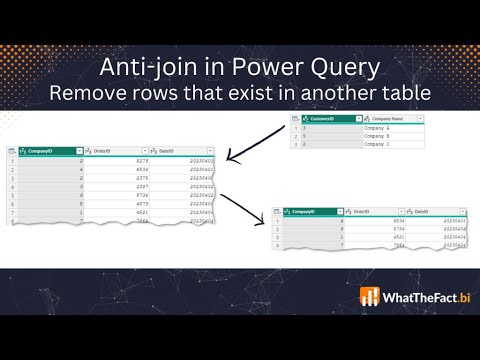
For our case, we imagine we have a fact table of multiple sales. We only want to analyze the sales to end customers, so we have to exclude our retail partners as they would produce a wrong result as their sales behavior is not the one of a typical end customer.
This is our sales table:

Fortunately, we already have a list of our business customer that we want to use for our anti-join. Be aware that one entry exists twice. This in on purpose, to check, if Power Query can handle that. But we will come to that later. This is our “black list” of retail customers that we want to exclude from our fact table:

What joins are there in Power Query
As mentioned, we can use a join to exclude the rows that are on the black list. In Power Query, a join is called a “merge”. To do that, you can just click on “Merge Queries” in the “Home” tab of Power Query:
 for data cleansing in Power BI 1")
After this you will see a dialogue similar to the following one:
 for data cleansing in Power BI 2")
First, we have to choose with which table we want to merge the selected table. In our case, that’s the “Companies” black list table. Then we have to select the columns that should be used for the merge. In our case, it’s the CustomerKey from the Sales table and the CustomerID from the Companies table.
We can also use multiple columns for a merge. For that you can hold Ctrl while clicking them in a row.
How to create an anti-join in Power Query
And now the important step happens, in the selection list of “Join Kind”, we have different kind of joins that we can select from. As we want to exclude in the first table everything that exists in the second table, we will select “Left Anti (rows only in first)“.
After we confirm with OK, all the rows that exist in the second table, are removed from the first table:
 for data cleansing in Power BI 3")
We have an additional column called “Companies” that would contain all rows of the join. As we have an anti-join they will all be empty, so we can just delete this new column and enjoy our result.
Summary
We’ve seen how easy it is to remove rows that exist in another table and perform an anti-join. This task might seem simple, but I’ve had a few requests recently on how to do that, why I chose to write this article.
One thing I didn’t mention anymore is the question about the duplicate row. As you’ve seen, all rows for company number 3 were removed and there was no error message. So even if you create your “black list” with an SQL query and might have duplicate rows because of a changing name, the anti-join will not break and is able to handle that.
Download Example file: